
Love is to the heart the harvest of all the loveliest flowers of the soul. ~ Author Unknown
Besides the celebrations for grads and dads, June is the favorite month for couples to tie the knot. Getting married is a wondrous event experienced at a variety of venues from the simple backyard wedding to a grand hotel extravaganza, and everything in between.  Itâs one of those rites of passage bringing family and friends together to commemorate the love of two individuals. Sometimes the price for these enchanted âI doâsâ can be staggering. One way to cut costs while also encouraging a collaborative, meaningful activity is to create your own bouquets, boutonnieres, corsages, and floral arrangements.
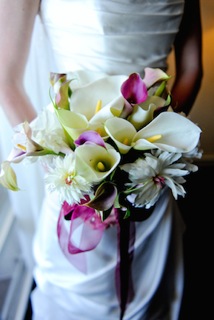
For both weddings of my son and daughter, I spent months growing their favorite blooms, then designed and hand crafted the floral components. The vow exchange for my son occurred on a hill on our Napa ranch overlooking the vineyards and Lake David. For that springtime ceremony, the hillside wine barrel tables were festooned with mason jars filled with local wild flowers while the bridal bouquets, boutonnieres, and corsages boasted my homegrown calla lilies, peonies, roses, and forget-me-nots. The dining tables were simply decorated with merlot hued rose petals scattered amongst the private label wine allowing the food to take center stage.
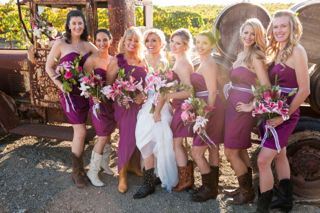
For my daughterâs Southern California vineyard wedding, I transported over 50 pounds of my Moraga garden floral fronds via airplane. Because the venue was stunning, she wanted the table décor to be simple and ethereal. A mix of feathery grasses, heather, sage, and flax filled wine bottles painted with the table number for a perfect blend of simplicity and elegance. The day before the nuptials, I hosted a Flower Party luncheon for all the ladies walking down the aisle where I taught everyone how to make their own personal bouquet using a sample I had created as an example. Stargazer lilies, roses, gardenias, freesia, alstroemeria, purple sage, grape leaves, razor grass, and narcissus soaked in buckets. A nearby table included all the necessary tools, ribbons, and adornments for a personalized touch. After the rehearsal dinner, my mother, daughter, daughter-in-law and I enjoyed a final female bonding date as we made the beautiful boutonnieres for the groom and his groomsmen using tiny white roses framed with ferns.
Crafting the flowers for the Big Day or any special occasion produces such joy and camaraderie and is a special way to show your love. There is nothing to fear and so much bliss to savor.  Itâs fun, simple, and extremely rewarding. Allow me to be your guide on the side offering these suggestions for DIY floral success.
First of all, it is important to have a conversation with the betrothed to define what their dreams and goals are for their Big Day. Even if we, as parents, are footing the bill for the celebration, we still have to keep in mind that this event is about them and not about us. Itâs their day and needs to be their vision. Talk to them and find out their specific wishes. Let them know that if they want you to create or help in creating floral displays, youâd be honored. They may provide you with tear sheets of ideas they have culled from magazines or bridal books. Assuming they are excited that youâll be an active participant and not just order from the professionals, here are the next steps.
PRELIMINARY PREPARATIONS
- 1. Have a frank discussion with the couple to determine their theme, color scheme, style, and flowers they are seeking.
- 2. Choose flowers that have staying power. Popular choices include sunflowers, hydrangeas, roses, lilies, orchids, succulents, dahlias, clematis, iris, zinnia, callas, peonies, herbs, delphiniums, iris, tulips, anthurium, snapdragons, freesia, foxglove, hollyhock, gladiola, and seasonal favorites.
- 3. Write down the names of each person who will need a bouquet, boutonniere, or corsage. If there are too many people and you are already feeling stressed, this is the time to decide exactly what you are willing to do.  If you want to make just your daughterâs bouquet and purchase the rest, thatâs totally fine and liberating.
- 4. Buy a swatch of fabric from the store that matches the bridesmaidsâ dresses. Put your swatch in a zip lock bag to carry in your purseâ¦everywhere! Youâll add the ribbons and other swatches as you go along.
- 5. Ask if they have any special flowers or greens they specifically want incorporated.
- 6. Determine whether you will grow the flowers and greens, buy them from a flower source, or engage a combination of the two.
- 7. Re-read my article, The Wild Bunch, as it is filled with tips on how to keep flowers and greens fresh.
- 8. Go to a crafts store or floral supply to buy green floral tape, wire, rolls of clear wrap, and ribbons that will coordinate with both the brideâs gown and the bridesmaid dresses.
- 9. Organize your tool bag. Include scissors, pruning shears, water buckets, masking tape, zip lock bags, rubber bands, hot glue gun, mister, floral tape, wire, clear wrap, ribbons, and cotton balls. Make sure to have a broom for clean-up.
- 10. Experiment with designing several different bouquets and boutonnieres at least a month in advance of the wedding. Take photos of your creations to share with your daughter, son, and anyone involved in the project design. Ask for feedback.
- 11. Log how long it took you to make each item. It will take at least that amount of time, if not more, before the big day.
PREP TIME
- 1. Three days before the event: Go into your garden or floral shop to gather the greens. Depending on the season, youâll need bear grass, boxwood, ferns, fountain grass, flax, evergreens, vines, or whatever suits the style and season. Cut the stems on an angle and soak overnight in cold water in deep buckets.
- 2. Two days before the event:Â Whether you are buying or growing the flowers, always choose fresh, tight buds. They will open naturally by the day of the wedding when prepared properly. Cut stems to soak up the water, separate flowers into species, plunge in cold water in a separate bucket from the greens. Cut stamens from lilies to prevent stains.
- 3. One day before the event: Create your bouquet beginning with the greens and add individual flower stems as you twist the arrangement in one hand until it looks as lush and full as you wish. Donât be afraid to add, subtract, nip, and tuck.
- 4. If you are adding an ornament, embellishment, beads, or other adornment, do it now. You may need to wire the decoration to the bouquet.
- 5. Holding your bouquet in one hand, wrap a piece of masking tape around the stems to hold the bouquet in place. Cut your coordinating ribbon and cover the tape and stems, leaving about 2 inches of stems uncovered.
- 6. Trim a small amount of the stems once again and wrap the entire bouquet with clear wrap, like the coverings of store-bought flowers. Tape the bottom to hold in place and write the name of the bridal party member on the package.
- 7. Plunge in cold water with ice. An ice bucket works well to keep each bouquet fresh. If you are keeping all the bouquets together, an ice chest is a great asset. Mist the flowers lightly.  If you are putting a bouquet in the refrigerator, you must remove any fruit or vegetables. Ethylene gas rots a bouquet quickly.
- 8. If you hold a Flower Power Party whereby each person constructs her own bouquet, make sure to label each arrangement with the individualâs name for easy identification on the wedding day.
- 9. For boutonnieres or corsages, wrap your chosen bud and leaf with the green floral tape. Wrap the ribbon around the floral tape to cover.
- 10. Finish the ends of the ribbon on the backside with a dab of hot glue. Mist the buds.
- 11. Place each boutonniere in an individual zip lock bag with a moist cotton ball not touching the flower. Add the name of the person and a couple of pins. Place in the refrigerator. I usually put all the bags in a large plastic container, then, put the container in the refrigerator.
WEDDING DAYÂ
- 1. An hour before the ceremony, remove the bouquets from the ice buckets, cut off the bottom stems evenly on each of the bouquets. Add the final ribbons, bows, and bangles. Bouquets no longer need to be in water or ice.
- 2. Pin the corsages and boutonnieres on the left side of each recipient, right over the heart. (For my daughterâs wedding, all the women in the bridal families, including grandmothers, mother of the groom, and myself carried small, simple bouquets instead of wearing a corsage. We all liked this approach better than the traditional cumbersome corsage.)
- 3. Distribute your bouquets to the bride and bridesmaids with big hugs.
- 4. Extra Tip: I always make at least three or four extra corsages and boutonnieres and two extra bouquets as accidents do happen. In addition, I create a bouquet for the bride to throw so that she can preserve the original, if she chooses. You can also make wreaths, braids, headpieces, and other creations with left over flowers to add to the décor.
Voila! Take a bow! Youâve done it yourself.
All of this takes time, patience, confidence, energy, creativity, and ultra organization. Before you embark on this DIY project, make sure you understand the obligations of this enterprise. You donât want to be frazzled for the wedding day itself.  Now that you know the work, time, and effort that generating glorious and original floral creations entails, you wonât suffer sticker shock at the price tag of purchased bodacious bouquets. If after a practice run, you realize that fabricating floral masterpieces isnât your forte, a fabulous florist is just a phone call away.
For assistance in learning this craft, I do offer personal consultations as well as classes and workshops on the Art of Flower Power. Email me,Cynthia@GoddessGardener.com
Wishing you the most beautiful wedding ever! Enjoy every second of this momentous once-in-a-lifetime event.
Happy Gardening and Happy Growing.
Cynthia Brianâs Harvest List for June
- Artichokes
- Â Cherries
- Â Loquats
- Â Mulberries
- Â Plums

Cynthia Brian is the Founder and Executive Director of Be the Star You Are!® charity, producer/host of the radio program StarStyle® Be the Star You Are!®, producer of Express Yourself!â¢, and editor/teen coach of Teen Scene.

